Forums

Help › Forums

For Dummies, Attaching JPEG to Threads

Sun, Mar 9 2014 5:08 AM (17 replies)
  • PAGES
  • 1
  • 2
  • Wheels65
    744 Posts
    Fri, Mar 7 2014 6:49 PM

    Neither seniority (been here too long) nor senility (lived too long) nor ignorance ( kinda speaks for itself) excuse lack of knowledge as to how to add jpegs (screen shots) to a post on the forum. Thought that a senior, senile, ignoramus could pass on what has learned this afternoon when he couldn't attach a "screen shot" into a discussion that he started (before he knew how to you get the pix into the discussion .....)!
              Previous Forum posts on this subject assume a level of computer knowledge WAY above ignorant! So ..
             1. Capture the screen that shows whatever you want to question or emphasize.
                 a. You can try the famous  Microsoft 'screen print" option - then learn how to save it OR  use a program like "Print Screen" (Google it) to 'capture' the screen.
                 b. Save your "capture", give it a name that you will remember 10 minutes from  now - (or give it a sufficiently lewd name that it will be truly - 'unforgettable') and save it on your computer.
             2. Open an account on a "Photo Sharing" website (preferably "free").
             3. Work thru the "uploading" instructions to discover how to actually move your jpeg (or jpg - for the purists here) {couldn't resist - some Bozo will make an issue of this} from your computer to the sharing site. (Be prepared for barely intelligible instructions  ((that assume a level of computer literacy above - - well - ignorant))).
             4. Once you've got the pix onto the 'share' site - edit  it down to 450 (or it will be too big for your post - but be advised that at 450 it is also too small for normal people to read on their monitors at WGT  --but,  such is WGT) - and save it.
                 a. Note the "general URL address" of your pix on the share site.
                 b. Windows machines can save this address with a "CTRL+C" - you Mac people are on your own here.
             5. Start your "New Post" - BE DARNED SURE TO click onto the turquoise shape that looks like a film strip - before you begin typing your post (least you, like me, will not be able to "attach" the pix to the post).
             6. Say your point (question - complaint - whatever you're trying to emphasize), press the "Enter" key a couple of times ( so your attachment doesn't cover your 'critical point'). Per item 4. above, you probably want to type any values that the screen shot shows - because they really will be too small for most people to read.
            7.  (Windows) Press "CNTL+V"

    VOILA (SP?) your screen shot will appear in your thread!

  • MBaggese
    15,367 Posts
    Fri, Mar 7 2014 9:54 PM

    Here;s a score card how to...jpgs are easier, usually don't resize.


    With Win 7 to capture an image, I go to:


    Accessories then snipping tool and "surround" the image I want.

    Others can used printscreen, copy to the clip board, save to (YJ help me out here-I forget the program to open) and edit the image...

    So here's how I do it after the image is captured, and a quick recap at the end:


    Okay Frank, once you learn/find out on your Mac how to "copy/capture" the scorecard, here's what you do....


    Save the captured image to a folder (mine is named WGT Cards).

    Create a photobucket account (free, just register)

    In photobucket "upload image/etc"...hit the browse button in Photobucket, then find (on your computer) the saved card in the folder you created.

    On a PC you click on the card you want to upload, then click "open" and it will be uploaded to your Photobucket Album.

    When you see the card in your PB Album, click on it...off to the right you'll see this box:
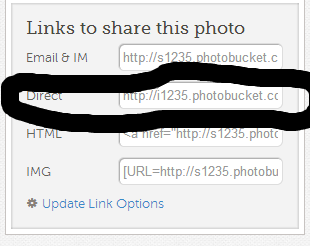
    Click once where I have circled and briefly "copied" will appear.


    Now go to WGT, open a new message, or reply to one...above the message box you'll see this:


    And click on the little "film strip" I have circled above and this will open up:
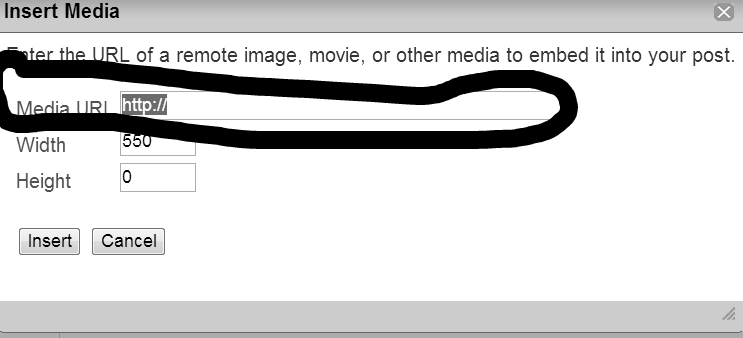
     

    And paste over the "Http" with what you "copied" before and click "insert"

    Now  once done the card will be too large, so now click on your pasted card and look again at the top of the message box, just to the right of the "film Strip" and click on the pencil thing to edit your size like so:

    Then this window will pop up:
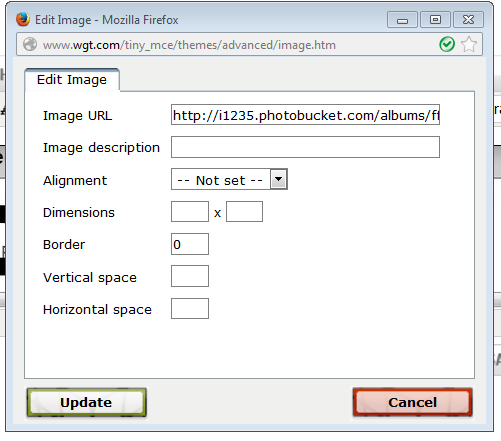
    See where it says dimensions in the box above?

    I use "450x250"

    Then click on "update"

    And post your reply/message


    It seems daunting at first, but really only a few steps...to recap:

    Capture image (scorecard) and save to a folder

    Upload image to PhotoBucket

    Click on image and copy the link I showed

    ""insert the image via the film strip"

    Edit the image via the pencil thing.


    Best of luck!


    Mike

    Edit:


    One additional thing I forgot, is once I "save the captured image", I name it something like "Eagles Round 1"-etc...on a PC if you don't name it a new file name, it defaults to "capture" and you keep over writing old cards withe the same name...and once that happens, if you posted that before, it's now replaced with the "new capture" name.

  • ScottHope
    10,444 Posts
    Sat, Mar 8 2014 4:31 AM

    Helpful stuff guys.....can I just point out a couple of things. In your post MB, where you state that you resize your image to 450 x 250 to fit the post box, good advice, but if you leave either one of the dimension boxes blank, doesn't matter which one, the picture will resize to the dimension you have entered but it will retain it's original aspect ratio. Enterng dimensions in both boxes will resize the image to your entered values, possibly distorting the image.

    Secondly, if your original image is say, 200 pixels wide, then typing a width of 400 into the edit image dialogue box to make it bigger won't work, it'll just get posted at it's original size, (you can make it smaller, but you can't make it bigger that way, such is life, lol)  You can enlarge it by changing the HTML code but I'm not going into that here.

  • Mushy01
    2,567 Posts
    Sat, Mar 8 2014 4:37 AM

    When  adding the URL for the image, in the next box down, change the 550 to 450 ..... this will display correctly and also allow people to right click the image and view at the full size ;-)

  • PaulTon
    10,731 Posts
    Sat, Mar 8 2014 5:09 AM

    All great advice, just to add - to get a url for the pic I use postimage..org, no sign up required , it's free (obviously, I'm Scottish) and I find it the easiest to use. I use the 'do not re-size my image' option then take the 'direct link'  from the list of generated url's.

    I resize image from the 550 (in media clicky up ^^^ there) to 470, to use in forum and PM's. If posting a pic on a players wall 470 is way too big, I can't remember offhand but I think the correct size for that is around the 300 mark, someone else may know the exact size.

    Mushy01:

    When  adding the URL for the image, in the next box down, change the 550 to 450 ..... this will display correctly and also allow people to right click the image and view at the full size ;-)

     I didn't know about the right click! Thanks Mush.

    Very good thread. I learned through trial and error and most attempts were the latter to begin with.

    Edit - When I post links they open in the same tab. Is this the forum default? Is there something I can do so it opens in a new tab?

  • ScottHope
    10,444 Posts
    Sat, Mar 8 2014 6:50 AM

    You can change it with the 'Insert/edit link' dialogue box Paul, just change the target to 'Open link in a new window'.

    Then you have to configure your browser to open links in a new tab if you still don't get the effect you're after.

  • YankeeJim
    25,827 Posts
    Sat, Mar 8 2014 7:09 AM

    Wheels65:
    give it a name that you will remember 10 minutes from  now

    LOL. Saw the thread title and immediately thought to myself "where's Wheels?" Then I see the author-nice work figuring it out.

    When you save that image just overwrite the last file you saved. When you click "Save as" the last folder you used pops up. Name the picture so that it's first in line in the window that pops up and then just use that name for succeeding saves. This way you don't have to remember what you called the shot. My image server-ImageShack-keeps all the uploads I ever made so it's easy to go back and get a particular picture.

    Wheels65:
    VOILA (SP?)

    Congratulations for getting this right. "Wala" drives me nuts as I'm sure it does the French speakers.   :-D

  • ScottHope
    10,444 Posts
    Sat, Mar 8 2014 7:18 AM

    Jim, one thing I didn't like about Imageshack™ when I used to use it was, if you had deleted an image from Imageshack™ and then uploaded an updated version of that same image with exactly the same filename, Imageshack™ would give that new image a different URL, which meant changing the link of that image everywhere that you had posted it. Do they still do that?

    Photobucket™ doesn't do that, if you upload an updated image with the same filename as the previous image version the URL stays the same, so you don't have to go around editing the links for that image, which means wherever you posted the original picture, it willl get updated to show the new picture automatically.

  • YankeeJim
    25,827 Posts
    Sat, Mar 8 2014 7:23 AM

    ScottHope:

    Jim, one thing I didn't like about Imageshack™ when I used to use it was, if you had deleted an image from Imageshack™ and then uploaded an updated version of that same image with exactly the same filename, Imageshack™ would give that new image a different URL, which meant changing the link of that image everywhere that you had posted it. Do they still do that?

    No. I'm running a tournament in the CC that I keep members current on by Snipping a spreadsheet and uploading that image. I do exactly what I mentioned above and have never seen a problem.

    ImageShack recently went to a 30 free trial after which you had to pay an annual fee to use it. While this might put some off, it was only $20 and the difference in the way the site works is well worth it. Uploads are almost instant and each stored upload has a specific URL.

    I'm wondering about your case, though, because I've gone looking for earlier posts from you on occasion and I come across that broken image link a lot.

  • ScottHope
    10,444 Posts
    Sat, Mar 8 2014 7:26 AM

    Could you point me to a post with said broken link?

  • PAGES
  • 1
  • 2
RSS